When you’re trying to wire a 4-wire pool light to a 3-wire light socket, hooking things up wrong can cause electrical problems and create safety hazards. However, you can adapt a 4-wire light to a 3-wire system safely and effectively.
The best way to connect a 4-wire pool light to a 3-wire socket is to correctly pair the hot, neutral, and ground wires while safely handling the additional wire. Always ensure the power is turned off before attempting any connections.
In this article, I’ll explain how to understand the wiring differences and the right way to adapt the wiring. I’ll also give you some safety stuff to think about when you make these connections.
Understanding the Wiring Difference
A 4-wire setup and a 3-wire socket differ fundamentally in how they handle electrical current and control. Pool lights with 4-wire configurations often include two hot wires, a neutral, and a ground. One hot wire is typically used to control the light’s primary function, while the second hot wire is for secondary features, such as color-changing or dimming options. The neutral wire carries current back to the electrical panel, and the ground wire ensures safety by connecting the light fixture to the earth, protecting against electric shock.
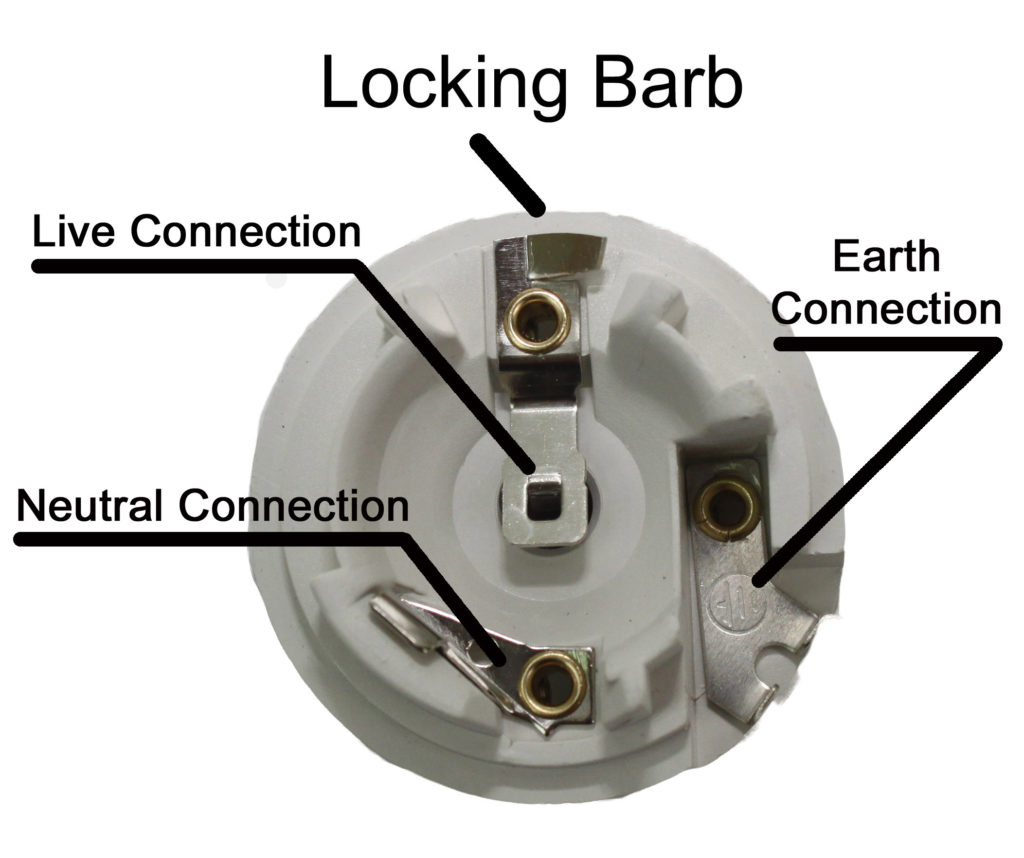
On the other hand, a standard 3-wire socket includes only one hot wire, one neutral, and one ground. The hot wire provides power to the light, the neutral wire returns the current, and the ground serves the same protective function. The challenge arises because there’s no clear place to connect the second hot wire when moving from a 4-wire system to a 3-wire socket.
Step-by-Step Guide: Connecting the 4-Wire Pool Light to a 3-Wire Socket
Safety First
Before starting, turn off the power at the breaker to avoid electric shocks. Use a voltage tester to ensure that no current is flowing to the socket. This is crucial for your safety as well as the equipment’s protection.
Connecting the Hot Wire
In the 4-wire system, the first task is identifying the primary hot wire, usually labeled or color-coded. This wire will be connected to the hot terminal in the 3-wire socket. Typically, in pool lights, this is a black or red wire. Connect this wire to the corresponding hot wire on the socket, making sure the connection is firm and secure.
Connecting the Neutral and Ground Wires
Next, focus on the neutral and ground wires. The neutral wire in the 4-wire setup, usually white, should be connected directly to the neutral terminal in the 3-wire socket. The ground wire, often green or bare, needs to be connected to the ground terminal in the socket. This ensures the pool light remains safely grounded, protecting against electrical surges or malfunctions.
Handling the Extra Wire
The final step is managing the extra hot wire from the 4-wire system. This wire typically controls secondary features of the pool light, such as color-changing functions. Since the 3-wire socket does not have a designated place for this extra hot wire, there are a few solutions:
- Cap the Wire: The simplest solution is to cap the extra wire with a wire nut. This disables the secondary feature but ensures the light works safely with its primary function.
- Install a Switch: If you wish to retain functionality for the secondary feature, you can install a separate switch that controls the extra wire. This would allow you to toggle between functions as needed.
- Consult an Electrician: For more complex pool lights, such as those with sophisticated control systems, it might be best to consult a professional electrician who can properly wire the system or suggest alternatives that fit your setup.

Common Mistakes to Avoid
One common mistake is misidentifying the neutral and ground wires, which can cause electrical short circuits or damage to the light fixture. Always ensure you have correctly labeled the wires before making connections. Another frequent error is mishandling the extra wire. Leaving it unconnected without capping or properly securing it can create safety hazards. To avoid these issues, double-check all wire connections, ensuring they are tight, secure, and safely insulated.
Additionally, failing to adhere to local electrical codes is a mistake often made by DIY enthusiasts. Always check whether the installation complies with your area’s electrical regulations to prevent future issues, particularly in environments like pools where safety is paramount.
Importance of Compatibility and Safety Standards
Adhering to safety standards is critical when dealing with pool lights, especially around water where electrical hazards are more prominent. It’s important to ensure that the pool light and socket you are using comply with certifications like UL (Underwriters Laboratories) in the U.S. or CE and RoHS certifications in Europe. These certifications ensure that the products meet specific safety and quality standards, which can reduce the risk of electrical accidents.
In addition, you should always follow the manufacturer’s guidelines and local electrical codes when performing installations. Pool lights often require waterproof or water-resistant fittings, so using compatible, certified products ensures safety and durability in wet environments.
When to Seek Professional Help
There are some situations where calling a professional electrician is the best course of action. If you’re unsure about the wiring setup, experience any flickering or unexpected behavior in the pool light, or are working with an older electrical system, it’s safer to seek professional assistance. Electricians can assess the wiring, make the appropriate connections, and ensure that everything adheres to electrical codes, preventing future issues.

Final Words:
You can wire a 4-wire pool light to a 3-wire socket safely by identifying the wires, making the connections and taking some safety precautions. For more complicated setups, don’t hesitate to call an electrician.